iOS Screenshot Automation Using View Snapshots
If you’ve been around the block as an iOS developer, you may have used UI tests before. They allow you to automatically test your app by simulating taps and key presses. It’s like having a virtual user of your app.
Using Fastlane, you can even use UI tests to automate taking your App Store screenshots.
Screenshots for the App Store must be supplied to Apple in at least two different device sizes (four if you support the iPad), and preferably they should be localized for each language your app supports. The process of taking all these screenshots by hand is time-consuming, as you can imagine. So it’s nice that we can automate it!
However, there’s a problem with UI tests.
The problem #
UI tests on iOS are very unreliable. At my job, we’ve implemented them on multiple different client projects, but we could never get them to work reliably 100% of the time. The tests fail randomly some of the time because the test runner suddenly couldn’t find a UI element, or some timing was off. In my opinion, this is worse than having no tests at all. Running the same tests over and over again (without changing any code) but getting different results is madness.
On top of that, UI tests are also very slow. They don’t that run much faster than real time, as if a person were using the app. And for every test case, the app boots up with a clean slate and the automation code must go through all the steps to get to the point in the app where it can perform the test.
My solution #
I’ve been working on a new app in SwiftUI, making heavy use of SwiftUI previews during development. I figured:
Why can’t I just snapshot the SwiftUI previews I already have, and use them as my App Store screenshots?
So that’s exactly what did.
There is no developer API to SwiftUI previews. But it’s easy to snapshot a view to an image. We can even do this from a unit test target, which runs way faster than a UI test target.
Snapshotting and test attachments #
At WWDC 2019 Apple introduced test result bundles. Every time you run your tests, Xcode produces a result bundle that contains an overview of which tests were run, the code coverage information, information about the test environment, and last but not least: file attachments.
This is especially useful in Continuous Integration (CI) systems, because you can look at your test result bundle after the fact to better understand why your test failed.
We’re going to use the file attachments to store our snapshots.
I wrote an extension to XCTestCase to snapshot a SwiftUI view and attach to the result bundle:
import XCTest
import SwiftUI
import UIKit

extension XCTestCase {
  /// Screenshot a SwiftUI view and attach it to the test result bundle
  func snapshot<V: View>(view: V, name: String) {
    let viewController = UIHostingController(rootView: view)
    let view = viewController.view!
    view.frame = UIScreen.main.bounds

    let renderer = UIGraphicsImageRenderer(size: view.bounds.size)
    let image = renderer.image { _ in
      view.drawHierarchy(in: view.bounds, afterScreenUpdates: true)
    }

    let attachment = XCTAttachment(image: image)
    attachment.lifetime = .keepAlways
    attachment.name = name
    add(attachment)
  }
}
Next we write some test cases where we snapshot the different views of the app.
We pass a SwiftUI view to the snapshot function that it will render, just like we would provide a view to a SwiftUI preview. You can of course fill the view with mock data and customize it using modifiers or environment values. For example to make it display in dark mode.
class BehappScreenshots: XCTestCase {
  func testOnboardingIntro() {
    snapshot(view: OnboardingIntroView() {}, name: "1_OnboardingIntroView")
  }
  func testCodeVerification() {
    snapshot(view: CodeVerificationView(code: "4213"), name: "2_CodeVerificationView")
  }
  func testLocationPermission() {
    snapshot(view: LocationPermissionView(), name: "3_LocationPermissionView")
  }
  func testNotificationPermission() {
    snapshot(view: NotificationPermissionView(), name: "4_NotificationPermissionView")
  }
  func testNotificationSettings() {
    snapshot(view: OnboardingNotificationTimingView() {}, name: "5_NotificationTimingView")
  }
  func testHome() {
    snapshot(view: HomeView().environmentObject(Preferences.shared), name: "6_Home")
  }
}
When we run the tests and navigate to the test results in the sidebar, we get a nice overview of the test cases and their attached snapshots.
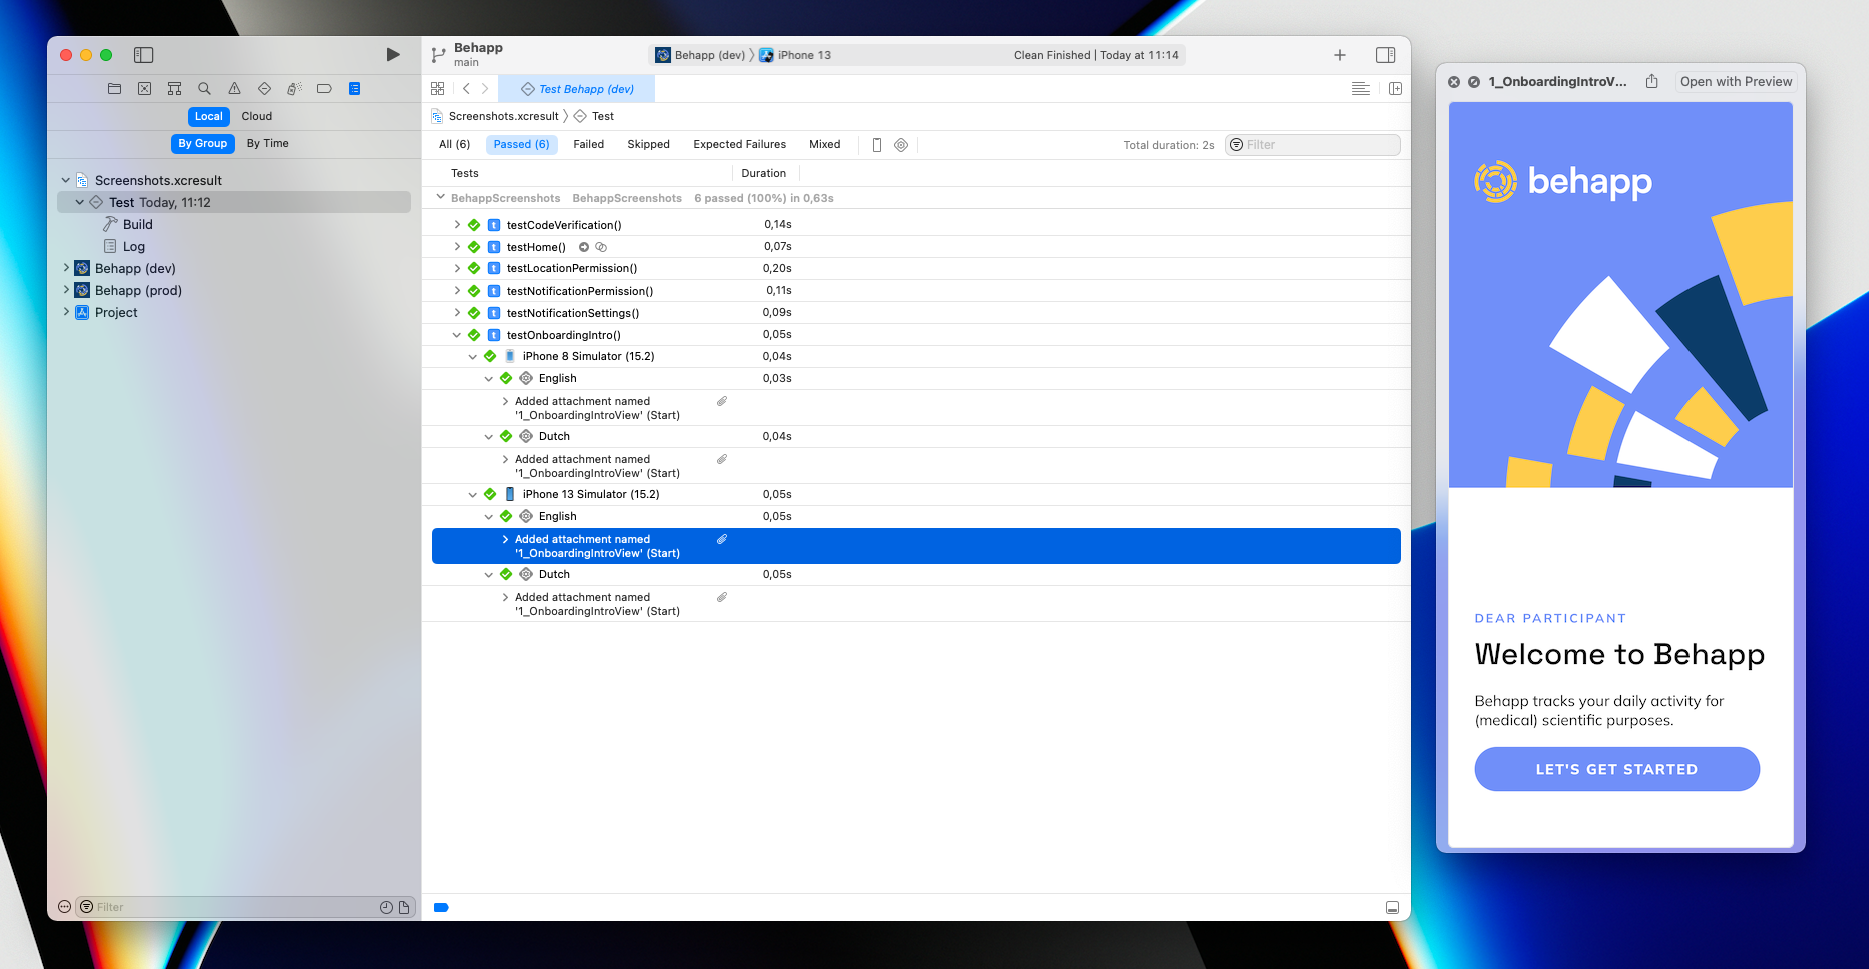
As you can see it runs blazingly fast compared to UI tests. You can run this on a combinations of different simulated device sizes (iPhone, iPad) and languages (English, Dutch), and it still finishes pretty fast.
That’s where test plans come in.
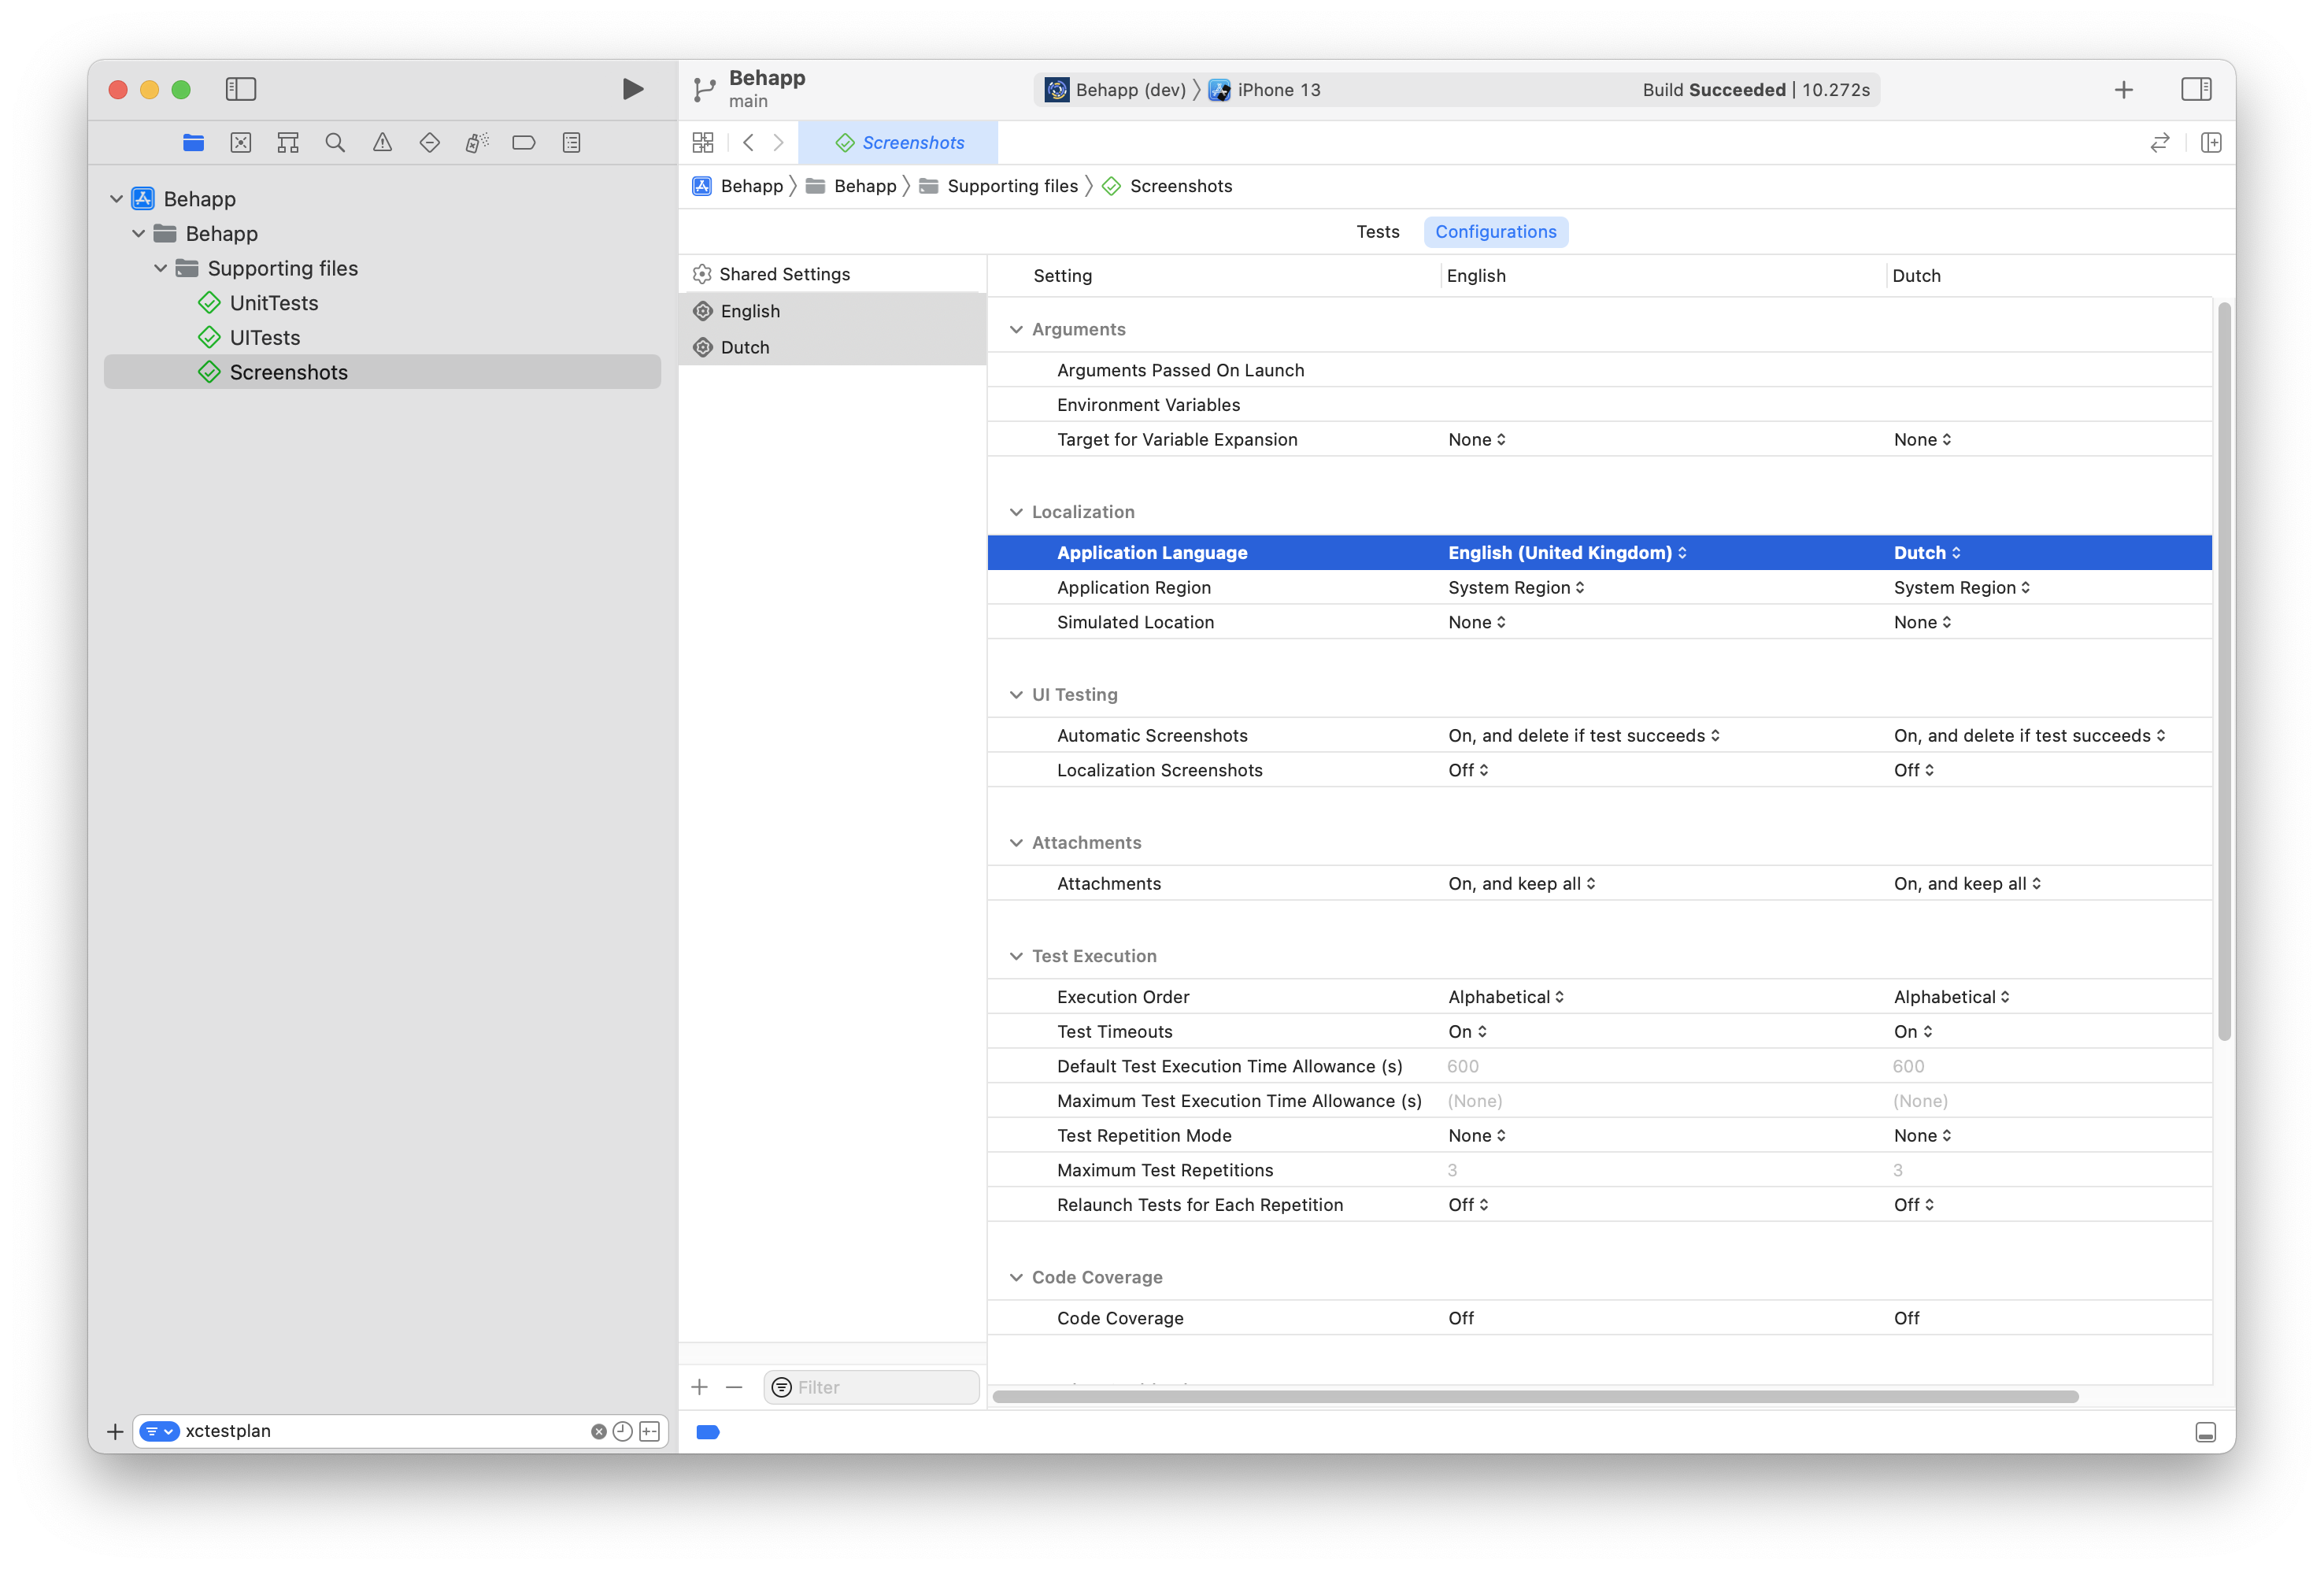
Test plans #
Also introduced in the same WWDC 2019 talk were Xcode test plans. A test plan lets you select which tests to run and under which configuration(s) they should be run.
For example: we can run all of our test cases with a configuration for the English locale, and run them again with a configuration for the Dutch locale.
Putting it all together #
Finally, I wrote a small shell script to automate all of the above. It runs the screenshot tests on two different iOS Simulators and exports the screenshots to a nice folder structure.
#!/bin/bash

# Stop script on error
set -e

# Check presence of the `xcparse` tool which we need later
if ! command -v xcparse &> /dev/null
then
    echo "xcparse could not be found. Please install it: brew install chargepoint/xcparse/xcparse"
    exit 1
fi

# Check presence of imagemagick
if ! command -v convert &> /dev/null
then
    echo "ImageMagick could not be found. Please install it: brew install imagemagick"
    exit 1
fi

# Clean up previous results if necessary
rm -rf ./Screenshots.xcresult
rm -rf ./screenshots
mkdir ./screenshots

# Run the 'Screenshots' test plan on all the devices we want (notch and no notch, small and large screens)
xcodebuild -quiet \
-project Behapp.xcodeproj \
-scheme "Behapp (dev)" \
-destination "platform=iOS Simulator,name=iPhone 8,OS=15.2" \
-destination "platform=iOS Simulator,name=iPhone 8 Plus,OS=15.2" \
-destination "platform=iOS Simulator,name=iPhone 13 Pro,OS=15.2" \
-destination "platform=iOS Simulator,name=iPhone 13 Pro Max,OS=15.2" \
-resultBundlePath "./Screenshots.xcresult" \
-testPlan Screenshots \
-maximum-concurrent-test-device-destinations 4 \
test

# Export the screenshots to a folder using the third-party `xcparse` tool
xcparse screenshots --os --model --test-plan-config "./Screenshots.xcresult" "./screenshots/"

# Remove alpha channel from the screenshots, otherwise the App Store will reject them
find ./screenshots -name "*.png" -exec convert "{}" -alpha off "{}" \;

# Reveal the folder in Finder
open ./screenshots
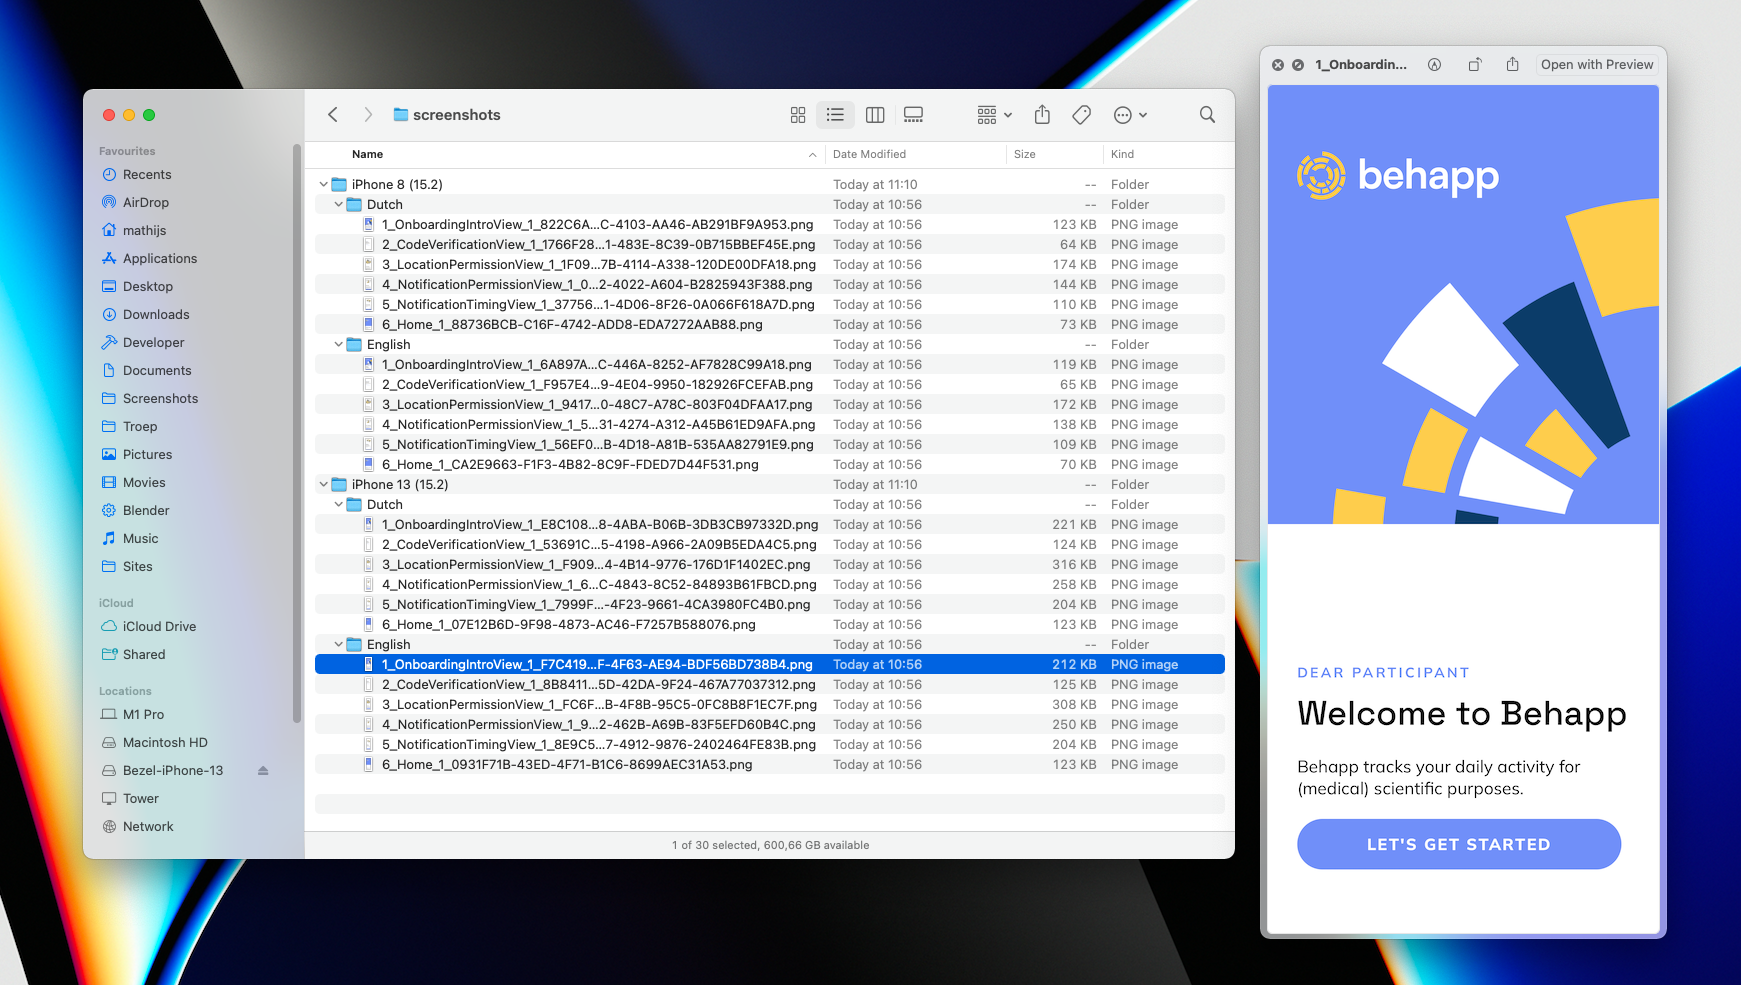
After running it, we get a nicely organized folder structure containing our screenshots:
Future improvements #
There is a downside to this approach: the generated screenshots do not include iOS system UI elements. So there’s no status bar or home indicator visible (on Face ID equipped iPhones).
If desired, these can be edited in afterwards. Apple provides device bezel templates for exactly this purpose. This could also be automated using a tool like ImageMagick. In the future, I plan to add that to the script above.